自己制作HEXO主题
没有找到心仪的个人博客主题
主要参考了HEXO主题开发、从零开始制作 Hexo 主题 和Gradient主题。
1
新建相关文件和文件夹,具体结构与Hexo自带的Landspace类似。目录结构如下:
theme-example              //自定义主题所在的文件夹
├── _config.yml            //主题相关配置
├── languages              //语言文件夹
├── layout                 //控制博客布局的文件
├── scripts                //网站的脚本存放位置
└── source                 //存放网站相关资源,css,js,图片等。
1.1
编辑主题配置文件_config.yml:
menu:
  Home: /
  Archives: /archives
  Github: https://github.com/zh-hongda
featured_image: img/default.jpg
然后在其他文件中就可以使用theme这个变量来拿到_config.yml中的配置。如theme.menu。
1.2
创建公用的布局文件./layout/layout.ejs,同时创建./layout/_partial/head.ejs和./layout/_partial/header.ejs,保存HTML的head和控制页面导航的布局。
layout.ejs:
<!DOCTYPE html>
<html>
  <%- partial('_partial/head') %>
  <body>
    <%- partial('_partial/header') %>
    <main class="main">
      <%- body %>
    </main>
  </body>
</htmlt>
head.ejs:
<head>
  <meta http-equiv="content-type" content="text/html; charset=utf-8">
  <meta content="width=device-width, initial-scale=1.0, maximum-scale=1.0, user-scalable=0" name="viewport">
  <title><%= config.title %></title>

</head>
header.ejs:
<header class="header">
  <div class="blog-title">
    <a href="<%- url_for() %>" class="logo"><%= config.title %></a>
  </div>
  <nav class="navbar">
    <ul class="menu">
      <% for (name in theme.menu) { %>
        <li class="menu-item">
          <a href="<%- url_for(theme.menu[name]) %>" class="menu-item-link"><%= name %></a>
        </li>
      <% } %>
    </ul>
  </nav>
</header>
每个模板都默认使用 layout 布局,也可以在 front-matter 指定其他布局,或是将 front-matter 中的 layout 设为 false 来关闭布局功能。
1.3
公用布局和局部模板设置结束后,就可以开始设计各个页面的个性化布局。比如index.ejs、archive.ejs和post.ejs分别控制首页、归档页和文章页的布局。他们都会使用共用布局layout.ejs所有他们将会有一样的导航模块。
index.ejs:
<section class="band">
    <% site.categories.forEach(function (category) { %>
      <div class="item-1">
        <a href="<%- url_for(category.path) %>" class="category">
          <div class="thumb" style="background-image: url(<%- config.root %><%- theme.featured_image %>);"></div>
          <article>
            <h1>
                <%- category.name %>
            </h1>
          </article>
        </a>
      </div>
    <% }); %>
</section>
<%- partial('_partial/paginator') %>
archive.ejs
<section class="archive">
  <ul class="post-archive">
    <% page.posts.each(function (post) { %>
      <li class="post-item">
        <span class="post-date"><%= date(post.date, "YYYY-MM-DD") %></span>
        <a class="post-title" href="<%- url_for(post.path) %>"><%= post.title %></a>
      </li>
    <% }) %>
  </ul>
</section>
<%- partial('_partial/paginator') %>
post.ejs:
<article class="post">
  <div class="post-title">
    <h2 class="title"><%= page.title %></h2>
  </div>
   <div class="post-meta">
    <span class="post-time"><%- date(page.date, "YYYY-MM-DD") %></span>
  </div>
  <div class="post-content">
    <%- page.content %>
  </div>
</article>
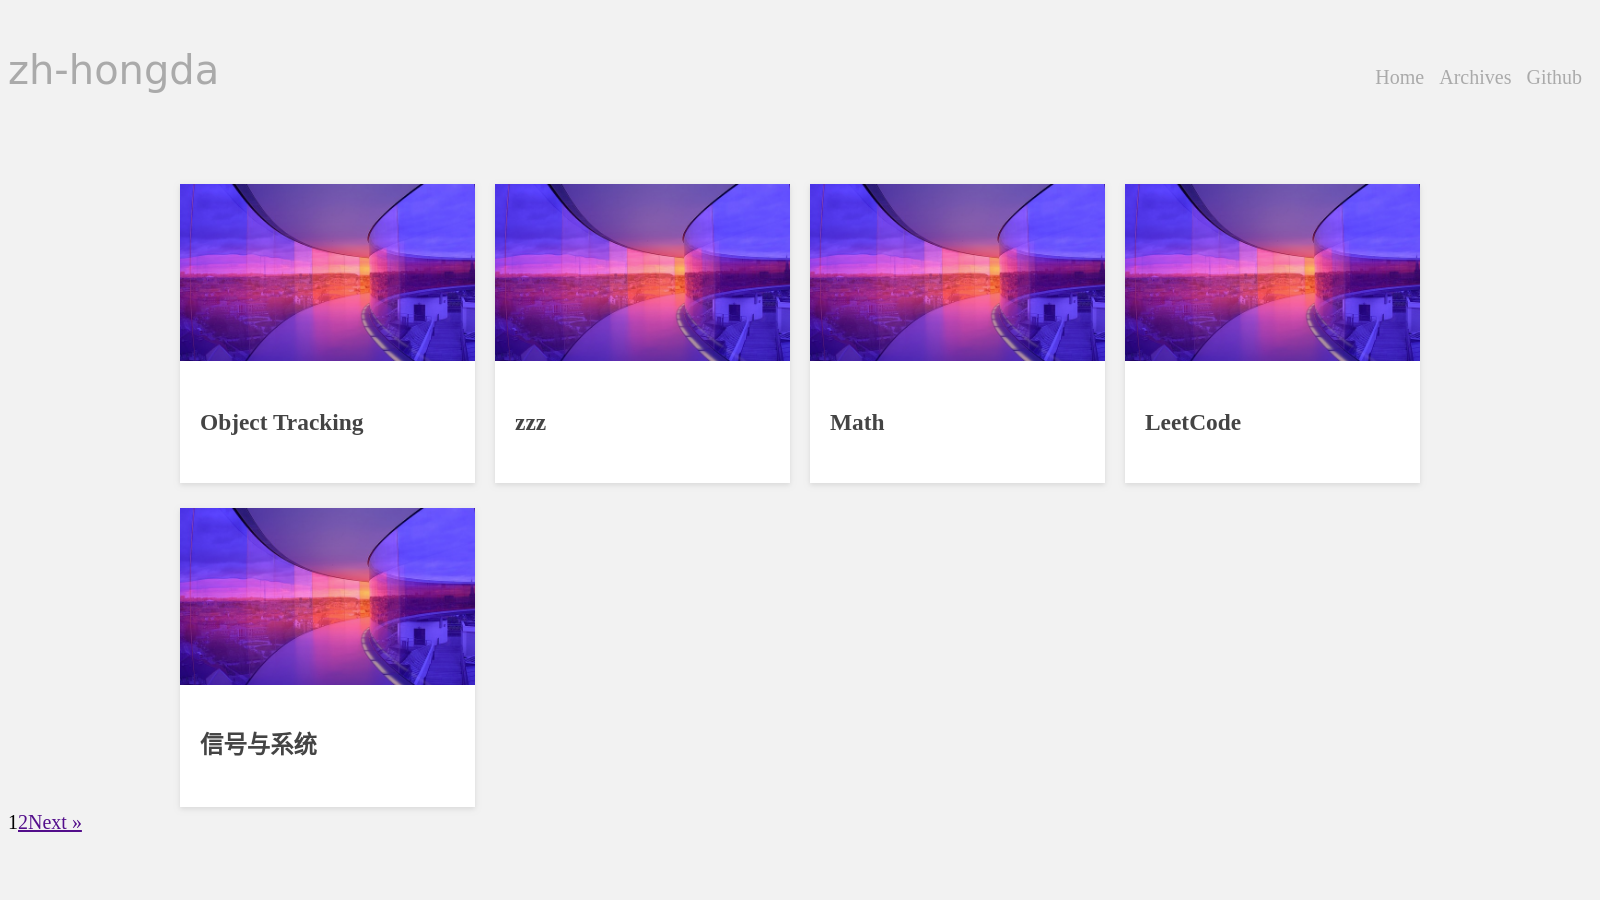
此时的网页是这个样子的:

2
上一章节已经设置好了博客的布局,所有虽然有了内容但是还比较丑。这一章节调整页面的样式。
在 ./source/css 文件夹中创建 style.styl,编写一些基础的样式,并把所有样式 import 到这个文件。所以最终编译之后只会有 style.css 一个文件。创建 _partial/index.styl、_partial/header.styl 与 _partial/post.styl 存放首页、页面导航以及文章的样式,并且在 style.styl 中 import 这三个文件。
style.styl:
body {
  background-color: #F2F2F2;
  font-size: 1.25rem;
  line-height: 1.5;
}

.container {
  max-width: 960px;
  margin: 0 auto;
}

@import "_partial/header";
@import "_partial/post";
@import "_partial/archive";
@import "_partial/index";
_partial/index.styl
.band {
  width: 90%;
  max-width: 1240px;
  margin: 0 auto;
  display: grid;
  grid-template-columns: repeat(4, 1fr);
  grid-template-rows: auto;
  grid-gap: 20px;
  padding-top: 5%;

}

.category {
  background: white;
  text-decoration: none !important;
  color: #444 !important;
  box-shadow: 0 2px 5px rgba(0, 0, 0, 0.1);
  display: flex;
  flex-direction: column;
  min-height: 100%;
  position: relative;
  top: 0;
  transition: all .1s ease-in;
  margin-top: 5px;
}

.category .thumb {
  padding-bottom: 60%;
  background-size: cover;
  background-position: center center;
}

.category article {
  padding: 20px;
  justify-content: space-between;
}
_partial/header.styl:
.header {
  margin-top: 2em
  display: flex
  align-items: baseline
  justify-content: space-between

  .blog-title .logo {
    color: #AAA;
    font-size: 2em;
    font-family: "Comic Sans MS",cursive,LiSu,sans-serif;
    text-decoration: none;
  }

  .menu {
    margin: 0;
    padding: 0;

    .menu-item {
      display: inline-block;
      margin-right: 10px;
    }

    .menu-item-link {
      color: #AAA;
      text-decoration: none;

      &:hover {
        color: #368CCB;
      }
    }
  }
}
_partial/post.style:
.post {
  margin: 1em auto;
  padding: 30px 50px;
  background-color: #fff;
  border: 1px solid #ddd;
  box-shadow: 0 0 2px #ddd;
}

.posts  {
  .post:first-child {
    margin-top: 0;
  }

  .post-title {
    font-size: 1.5em;

    .post-title-link {
      color: #368CCB;
      text-decoration: none;
    }
  }

  .post-content {
    a {
      color: #368CCB;
      text-decoration: none;
    }
  }

  .post-meta {
    color: #BABABA;
  }
}
最后,我们需要把样式添加到页面中,这里使用了另外一个辅助函数 css():layout/_partial/head.ejs:
<head>
  <meta http-equiv="content-type" content="text/html; charset=utf-8">
  <meta content="width=device-width, initial-scale=1.0, maximum-scale=1.0, user-scalable=0" name="viewport">
  <title><%= config.title %></title>
  <%- css('css/style.css') %>
</head>
至此,样式也设置完毕,现在我们的博客时这样的:

3
目前实现了:
首页显示不同的类别(而不是文章),点击图片后可以跳转到对应的类别。
还需要做的:
不同类别对应不同图片
首页添加横幅,导航样式也需要进一步修改
对应类别打开后的页面(显示本类别下的文章)美化。
所以本文不定时更新。
我目前的具体结构为:
theme-example               //自定义主题所在的文件夹
├── _config.yml             //主题相关配置
├── languages               //语言文件夹,暂时没有做多语言,所有该文件夹下为空
├── layout                  //控制博客布局的文件
│   ├── archive.ejs         //博客归档页的布局
│   ├── index.ejs           //博客首页布局
│   ├── layout.ejs          //总布局,
│   ├── _partial            //部分布局,将可能需要复用的布局单独存放,方便复用。
│   │   ├── head.ejs
│   │   ├── header.ejs
│   │   └── paginator.ejs
│   └── post.ejs            //文章页布局
├── scripts                 //网站的脚本存放位置,现在还没有用到任何脚本,所以为空
└── source
    ├── css                 //控制网页样式相关的文件
    │   ├── _partial
    │   │   ├── archive.styl
    │   │   ├── header.styl
    │   │   ├── index.styl
    │   │   └── post.styl
    │   └── style.styl
    ├── images             //存放博客中用到的图片
    │   ├── aaa.jpg
    │   ├── bbb.jpg
    │   ├── ccc.jpg
    │   ├── ddd.jpg
    │   └── eee.jpg
    └── img               //现在首页中表示分类用到的默认图片,
        └── default.jpg
4
接上文,2020/8/28
- 实现,不同类别对应不同图片
修改/source/images文件夹下图片名为对应的类别名,注意名字中不要包含空格。
修改/layout/index.ejs文件
<section class="band">
    <% site.categories.forEach(function (category) { %>
      <div class="item-1">
        <a href="<%- url_for(category.path) %>" class="category">
          <!-- <div class="thumb" style="background-image: url(<%- config.root %><%- theme.featured_image %>);"></div> -->
          <div class="thumb" style="background-image: url(<%- config.root %><%- theme.featured_image %><%- category.name %>.jpg);"></div>
          <article>
            <h1>
                <%- category.name %>
            </h1>
          </article>
        </a>
      </div>
    <% }); %>
</section>
实现代码高亮
使用highlight实现代码高亮
<!-- 在/source下新建lib文件夹,并放入下载的[高亮包](https://highlightjs.org/)。 -->

<!-- 在`themes\theme-example\layout\_partial\header.ejs`中加入 -->
  <%- css('/lib/highlight/styles/vs2015') %>

<!-- 并对`themes\theme-example\layout\layout.ejs`做如下修改 -->
    <body>
      <%- partial('_partial/header') %>
      <main class="main">
        <%- body %>
      </main>

      <!-- 引入代码高亮的 js -->
      <%- js('/lib/highlight/highlight.pack.js') %>
      <script>hljs.initHighlightingOnLoad();</script>
    </body>
  </htmlt>
使用prism实现代码高亮
<!-- 禁用 highlight.js 修改站点根目录下的 _config.yml 配置文件,具体如下: --> highlight: enable: false line_number: false auto_detect: false tab_replace: <!-- 获取 prism.js,下载页面:https://prismjs.com/download.html; --> /themes/next/source/js/prism/prism.js /themes/next/source/js/prism/prism.css <!-- 1、配置 prism.js,修改 $HEXO/themes/next/layout/_partials/head.swig,在尾部添加以下代码: --> <link rel="stylesheet" href="/js/prism/prism.css"> <!-- 2、修改 $HEXO/themes/next/layout/_partials/footer.swig,在尾部添加以下代码: --> <script src="/js/prism/prism.js" async></script> <!-- 3、修改博客配置,打开根目录下的_config.yml文件,添加下面代码 --> marked: langPrefix: line-numbers language- <!-- 4. 测试prism,清理后,重新运行直接测试 --> hexo clean hexo s添加公式支持
在
\theme-example\layout\_partial目录中新建mathjax.ejs,填入如下js代码:<!-- MathJax配置,可通过单美元符号书写行内公式等 --> <script type="text/x-mathjax-config"> MathJax.Hub.Config({ "HTML-CSS": { preferredFont: "TeX", availableFonts: ["STIX","TeX"], linebreaks: { automatic:true }, EqnChunk: (MathJax.Hub.Browser.isMobile ? 10 : 50) }, tex2jax: { inlineMath: [ ["$", "$"], ["\\(","\\)"] ], processEscapes: true, ignoreClass: "tex2jax_ignore|dno", skipTags: ['script', 'noscript', 'style', 'textarea', 'pre', 'code'] }, TeX: { equationNumbers: { autoNumber: "AMS" }, noUndefined: { attributes: { mathcolor: "red", mathbackground: "#FFEEEE", mathsize: "90%" } }, Macros: { href: "{}" } }, messageStyle: "none" }); </script> <!-- 给MathJax元素添加has-jax class --> <script type="text/x-mathjax-config"> MathJax.Hub.Queue(function() { var all = MathJax.Hub.getAllJax(), i; for(i=0; i < all.length; i += 1) { all[i].SourceElement().parentNode.className += ' has-jax'; } }); </script> <!-- 通过连接CDN加载MathJax的js代码 --> <script type="text/javascript" async src="https://cdnjs.cloudflare.com/ajax/libs/mathjax/2.7.1/MathJax.js?config=TeX-MML-AM_CHTML"> </script>在
themes\theme-example\layout\_partial\header.ejs中添加如下代码,通过此配置变量决定是否加载mathjax.ejs 。有公式才加载MathJax,这点比较重要,没有公式仍然加载js渲染公式,会影响页面加载速度,在所有有公式的文章的front-matter中增加一项配置 mathjax: true,例如:
 ---
 title: 结构化机器学习项目
 tags:
   - 机器学习
 categories:
   - 机器学习
 date: 2017-10-9 22:22:00
 toc: false
 mathjax: true
 ---
<!-- 根据页面mathjax变量决定是否加载MathJax数学公式js --> <% if (page.mathjax){ %> <%- partial('mathjax') %> <% } %>
修改字体
<!-- 在styles.css中做下列修改,如果文件中已经有了就直接做修改,如果没有直接新建 -->
body {
    /* font-family: 'Open Sans', sans-serif; */
    font-family: 'SimHei', sans-serif;
}
 <!-- 修改序号的大小 -->
p {
    margin-top: 0;
    margin-bottom: 0rem;
    font-size: 1.5rem;
}
 <!-- 修改序号的大小 -->
::marker {
    color: rgb(3, 3, 3);
    font-size: 1.5rem;
}
<!-- 修改代码中标签的大小,比如 “<str name="host">”的大小 -->
span {
    font-size: 1.2rem;
}

 <!-- 在prism.css中做下列修改,如果文件中已经有了就直接做修改,如果没有直接新建,这个也是代码的大小 -->
pre[class*="language-"] {
    font-size: 1.15em;
}
参考: